| Version 10 (modified by adbe, 14 years ago) (diff) |
|---|
DEM scripts
This page details and explains the use of the DEM creation scripts:
lidardem.sh
asterdem.sh
nextmapdem.sh
lidar_aster_dem.sh
The scripts listed are written in bash.
These scripts are used to create a DEM from LiDAR and elevation model tiles. The scripts use grass GIS to read in the elevation tiles and perform patching and various other operations on the data to create a DEM.
GRASS GIS
GRASS is a GIS (Geograohic Information System) and details of it can be found at: http://grass.fbk.eu/. There is a detailed api and usage guide, it is available for free download at: http://grass.fbk.eu/download/index.php, as the scripts are written to run on linux, depending on your build of fedora run the following to install grass, the scripts use grass63 by default:
To get started download the template grass database: grass_db_template.zip
- Run the command:
- unzip grass_db_template.zip
- To check that the grass download works run: grass63 -text grass_db_template/UKBNG/PERMANENT/
- If it did not work successfully check the grass version that you have and the path to the grass template database
- If it did work successfully press Ctrl-D or type exit to exit
Creating a DEM from ASTER data using asterdem.sh script
ASTER tiles
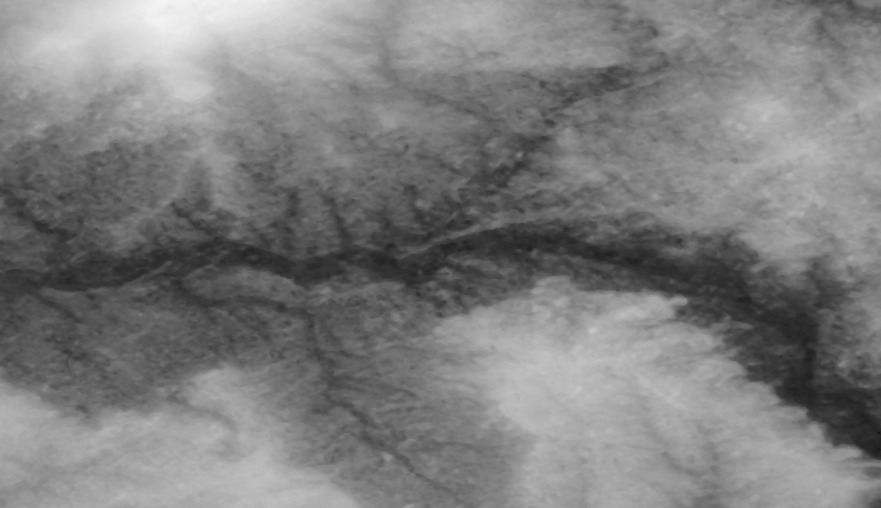
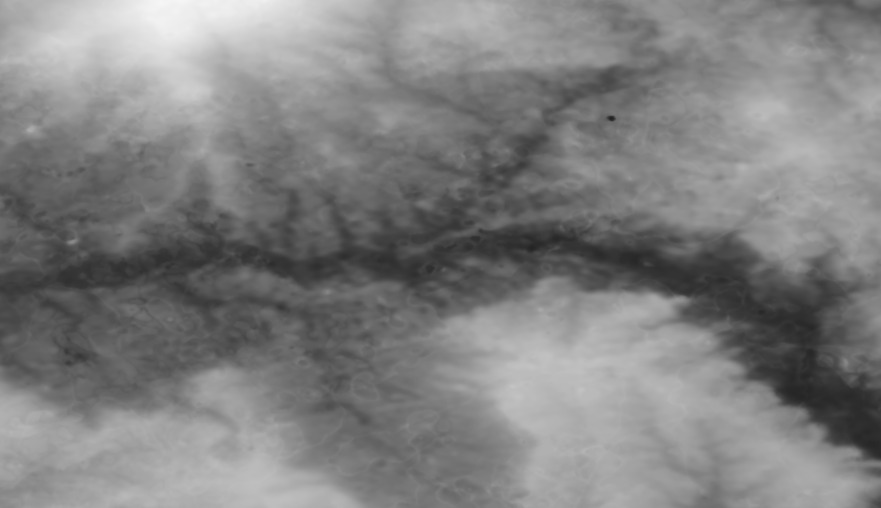
ASTER (Advanced Spaceborne Thermal Emission and Reflection Radiometer) is a sensor on the Terra satellite, ASTER is partly being used to obtain elevation maps. The ASTER tiles are 1 degree x 1 degree lat/lon. The ASTER version 1 have an approximate resolution of 30 metres, version 2 however has an approximate resolution of 15 metres.
15 metre resolution (left), 30 metre resolution (right)


ASTER tiles are in wgs84 lat/lon projection.
Downloading Tiles
The tiles can be downloaded from either of:
- http://reverb.echo.nasa.gov/reverb/
- Create an account or log in
- Tiles are downloaded by putting on an ftp site, the time period for this depends on the number of tiles, the fewer the faster
- The best method to select tiles is by a bounding box, drag the box over the desired region
- Type ASTER into the "Search Terms"
- Select "ASTER Global Digital Elevation Model V002" in the "Select Datasets"
- Then click "Search for Granules"
- Click accept on the Data quality summary
- Add all items to the cart
- Click view items in cart
- Click Order at the bottom of the page
- An order items list will appear, click set: select the data usage, and agree to the terms, make sure "Use these values for all applicable order items" is selected, then save
- Click proceed
- Click "Submit Order" at the bottom of the page
- A confirmation e-mail should be sent when the tiles are ready for download from an ftp site
- http://www.gdem.aster.ersdac.or.jp/
- Create an account or log in
- A tile count of under 100 can be downloaded immediately, over 100 the download is done in batches
- Click on Search in the dialog box on the left
- A page with a world map on it should have been loaded
- Tiles can be selected by clicking on "Select tiles directly" or "Select tiles by polygon"
- Select the desired tiles and click next
- Check that your selection is valid, then click next
- Select the purpose of the tile usage
- Then download the tiles.
Choosing Tiles
When creating an ASTER DEM it is important to choose the correct tiles to use, as this could impact on the speed at which the script runs, as if tiles with large gaps between them are chosen when grass fills the nulls it has a lot of nulls to fill, so will take a very long time. I suggest that a square region of tiles should be chosen, as this means that the script should not need to fill a large number of nulls. If you require tiles in the region (50.23 - 52.56, -2.34 - 1.23) lat/lon:
To calculate the tiles round the numbers down to get (50 - 52, -3 - 1), so you need:
ASTGTM2_N50W003_dem.tif ASTGTM2_N50W002_dem.tif ASTGTM2_N50W001_dem.tif ASTGTM2_N50E000_dem.tif ASTGTM2_N50E001_dem.tif ASTGTM2_N51W003_dem.tif ASTGTM2_N51W002_dem.tif ASTGTM2_N51W001_dem.tif ASTGTM2_N51E000_dem.tif ASTGTM2_N51E001_dem.tif ASTGTM2_N52W003_dem.tif ASTGTM2_N52W002_dem.tif ASTGTM2_N52W001_dem.tif ASTGTM2_N52E000_dem.tif ASTGTM2_N52E001_dem.tif
The name of the tiles relates to the bottom left corner of the region so ASTGTM2_N50W003_dem.tif covers (50-50.9999, 3-3.0001).
Geoid Height Grid
A geoid spheroid height model is required to elevate the aster tiles to the correct geoid. As the tiles are in lat/lon it is best to elevate it to wgs84, because this is a good standard. To elevate the aster we use a geoid height grid available from:
When the file has been downloaded decompress it by running the command on the command line:
- gunzip ww15mgh.grd.z
Then to get the file in a format compatible with grass run, this gives a header compatible with grass:
- sed "s/ -90.000000 90.000000 .000000 360.000000 .250000 .250000/north: 90.000000 \nsouth: -90.000000 \nwest: 0.000000 \neast: 360.000000\nrows: 721\ncols: 1441/g" ww15mgh.grd -i
Separation Files
If projecting the aster data to another projection with a differing elevation model a separation file needs to be used to elevate the aster correctly. For example if projecting the DEM to a osgb36 UKBNG projection from wgs84 lat/lon the elevation model is different. To elevate the aster we need a description of the height differences between the geoid and the spheroid, a file describing the differences between the two can be found at:
- http://www.ordnancesurvey.co.uk/oswebsite/gps/docs/OSTN02_OSGM02files.zip
- Once the file has been downloaded run the command:
- mkdir OSTN02_OSGM02files; unzip OSTN02_OSGM02files.zip -d OSTN02_OSGM02files
- Now run:
- grass63 -text /PATH/TO/grass_db_template/UKBNG/PERMANENT/
- Grass should have opened if it did not look at the section above on Grass GIS
- First get the region that is going to be read in:
- r.in.xyz input=OSTN02_OSGM02_GB.txt output=OSTN02_OSGM02_GB.txt x=2 y=1 z=6 fs="," --overwrite -s
- This should return:
- r.in.xyz input=OSTN02_OSGM02_GB.txt output=OSTN02_OSGM02_GB.txt x=2 y=1 z=6 fs="," --overwrite -s
Range: min max x: 0.000000 700000.000000 y: 1.000000 876951.000000 z: -81.603000 0.000000
- Then actually set the region based on this, include a buffer size of 1 metre, resolution is 1000 for this file:
- g.region e=700001 w=-1 n=876952 s=0 res=1000
- Now read in the separation file:
- r.in.xyz input=OSTN02_OSGM02_GB.txt output=OSTN02_OSGM02_GB.txt x=2 y=1 z=6 fs="," --overwrite
- Now to check that the reading in of the file has worked run:
- gis.m
- In the manager click on "Add raster layer"
- Then click on "Base map" and select "OSTN02_OSGM02_GB.txt"
- In the "Map Display" click on "Redraw all layers".
- You should now see the raster map that has been read in
- gis.m
- Now the separation file has been read in a separation DEM can be created
- The raster map can be output to a file with the following command:
- r.out.gdal input=OSTN02_OSGM02_GB.txt output=uk_separation_file_UKBNG.dem format=ENVI type=Float32 nodata=0 --overwrite
- rm -f uk_separation_file_UKBNG.dem.aux.xml
- This DEM can be used as a separation file when projecting from osgb36 UKBNG to wgs84 lat/lon, however, we want it for projecting the other way. The DEM we have created here can be used later for use with the LiDAR, so do not remove it.
- The raster map can be output to a file with the following command:
- To project the DEM:
- First we need to get a vector representing the entire region of the DEM:
- v.in.region output=vector_box type=area --overwrite
- Then to get the resolution projected:
- Save the region so that we can get back here:
- g.region save=actualregion --overwrite
- Set the region to the the bottom left corner based on the resolution:
- g.region n=s+`echo \`g.region -p | grep nsres\` | awk '{print $2}'` e=w+`echo \`g.region -p | grep ewres\` | awk '{print $2}'`
- Create a vector box based on the resolution:
- v.in.region output=vector_box_res type=area --overwrite
- Reset the region:
- g.region actualregion
- Save the region so that we can get back here:
- To get the DEM in another projection:
- Project the resolution vector to the wgs84 lat/lon location:
- v.proj input=vector_box_res location=UKBNG mapset=PERMANENT output=vector_box_res --overwrite
- Set the region to be the size of the vector and then set the resolution:
- g.region vect=vector_box_res rows=1 cols=1
- Project the total region vector to the wgs84 lat/lon location:
- v.proj input=vector_box location=UKBNG mapset=PERMANENT output=vector_box --overwrite
- Set the total region:
- g.region vect=vector_box
- Project the separation file to the current location:
- r.proj input=OSTN02_OSGM02_GB.txt location=UKBNG mapset=PERMANENT output=OSTN02_OSGM02_GB.txt --overwrite
- Output the separation file:
- r.out.gdal input=OSTN02_OSGM02_GB.txt output=uk_separation_file_WGS84LL.dem format=ENVI type=Float32 nodata=0 --overwrite
- rm -f uk_separation_file_WGS84LL.dem.aux.xml
- Project the resolution vector to the wgs84 lat/lon location:
- First we need to get a vector representing the entire region of the DEM:
Configuring asterdem.sh
To run asterdem.sh on your system the files listed above need to be configured in the script to point to the correct places. For example, the template grass database in the script points to a place in the arsf directory and this needs to be changed to point to where your template grass database is located. Variables that need to be changed:
- TEMPLATE_GRASS_DATABASE=/users/rsg/arsf/usr/share/grass_db_template/
- GEOID_SPHEROID=/users/rsg/arsf/dems/geoid-spheroid/ww15mgh.grd
- WGS84LL_SEPARATION_FILE=/users/rsg/arsf/dems/aster/separation_files/uk_separation_file_WGS84LL.dem
- GRASS_VERSION=grass63
I would advise that the grass version be 6.3 as the script was written to work with this grass version.
Using asterdem.sh
The script is partly configured to be used in-house and so some options that are available are not applicable, as for example the navigation file is used to calculate the tiles to use by default. So here is a usage for out of house usage:
asterdem.sh
Generates a binary lat-long ASTER DEM from downloaded raw ASTER data
Arguments:
(Optional)
-h: Display usage and exit
-o: Final output filename for DEM, defaults to leaving in grass database
-j: Filename to output a jpeg image of the DEM
-a: Directory containing ASTER tiles only. If not given then script needs to be run within a project
-g: Grass database to use, defaults to creating one
-p: Projection of output tiles:proj4 string or UTM[utm_num(zero padded)](N|S) or UKBNG or ll
-r: Resolution of output DEM, defaults to using resolution of ASTER tile
-s: binary geoid-spheroid seperation file
-m: Maximum size of output DEM in GB, will be overridden by specified resolution. Note this does change the output resolution
-f: Do not fill nulls or smooth, i.e. do not run the command r.fillnulls and r.neighbours on the DEM before outputting
Attachments (3)
-
15_metre.jpg
(64.4 KB) -
added by adbe 14 years ago.
aster_15_m.jpg
-
30_metre.jpg
(45.8 KB) -
added by adbe 14 years ago.
aster_30_m.jpg
-
grass_db_template.zip
(4.4 KB) -
added by mark1 14 years ago.
grass_db_template
Download all attachments as: .zip