| Version 8 (modified by adbe, 14 years ago) (diff) |
|---|
DEM scripts
This page details and explains the use of the DEM creation scripts:
lidardem.sh
asterdem.sh
nextmapdem.sh
lidar_aster_dem.sh
The scripts listed are written in bash.
These scripts are used to create a DEM from LiDAR and elevation model tiles. The scripts use grass GIS to read in the elevation tiles and perform patching and various other operations on the data to create a DEM.
GRASS GIS
GRASS is a GIS (Geograohic Information System) and details of it can be found at: http://grass.fbk.eu/. There is a detailed api and usage guide, it is available for free download at: http://grass.fbk.eu/download/index.php, as the scripts are written to run on linux, depending on your build of fedora run the following to install grass, the scripts use grass63 by default:
To get started download the template grass database: grass_db_template.zip
- Run the command:
- unzip grass_db_template.zip
- To check that the grass download works run: grass63 -text grass_db_template/UKBNG/PERMANENT/
- If it did not work successfully check the grass version that you have and the path to the grass template database
- If it did work successfully press Ctrl-D or type exit to exit
Creating a DEM from ASTER data using asterdem.sh script
ASTER tiles
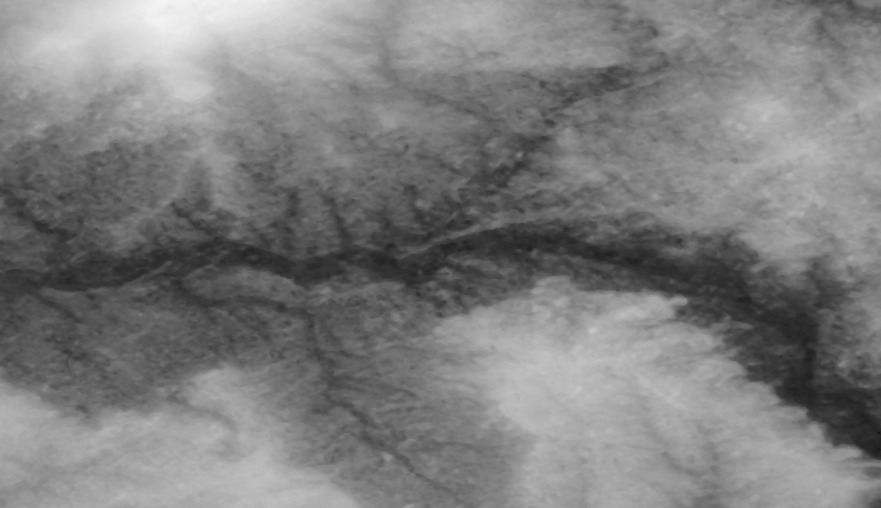
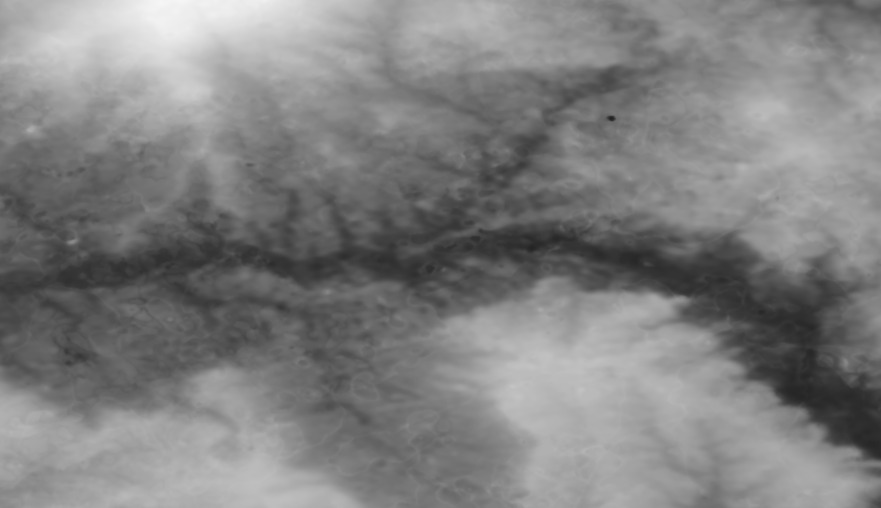
ASTER (Advanced Spaceborne Thermal Emission and Reflection Radiometer) is a sensor on the Terra satellite, ASTER is partly being used to obtain elevation maps. The ASTER tiles are 1 degree x 1 degree lat/lon. The ASTER version 1 have an approximate resolution of 30 metres, version 2 however has an approximate resolution of 15 metres.
15 metre resolution (left), 30 metre resolution (right)


ASTER tiles are in wgs84 lat/lon projection.
Downloading Tiles
The tiles can be downloaded from either of:
- http://reverb.echo.nasa.gov/reverb/
- Create an account or log in
- Tiles are downloaded by putting on an ftp site, the time period for this depends on the number of tiles, the fewer the faster
- The best method to select tiles is by a bounding box, drag the box over the desired region
- Type ASTER into the "Search Terms"
- Select "ASTER Global Digital Elevation Model V002" in the "Select Datasets"
- Then click "Search for Granules"
- Click accept on the Data quality summary
- Add all items to the cart
- Click view items in cart
- Click Order at the bottom of the page
- An order items list will appear, click set: select the data usage, and agree to the terms, make sure "Use these values for all applicable order items" is selected, then save
- Click proceed
- Click "Submit Order" at the bottom of the page
- A confirmation e-mail should be sent when the tiles are ready for download from an ftp site
- http://www.gdem.aster.ersdac.or.jp/
- Create an account or log in
- A tile count of under 100 can be downloaded immediately, over 100 the download is done in batches
- Click on Search in the dialog box on the left
- A page with a world map on it should have been loaded
- Tiles can be selected by clicking on "Select tiles directly" or "Select tiles by polygon"
- Select the desired tiles and click next
- Check that your selection is valid, then click next
- Select the purpose of the tile usage
- Then download the tiles.
Geoid Height Grid
A geoid spheroid height model is required to elevate the aster tiles to the correct geoid. As the tiles are in lat/lon it is best to elevate it to wgs84, because this is a good standard. To elevate the aster we use a geoid height grid available from:
When the file has been downloaded decompress it by running the command on the command line:
- gunzip ww15mgh.grd.z
Then to get the file in a format compatible with grass run, this gives a header compatible with grass:
- sed "s/ -90.000000 90.000000 .000000 360.000000 .250000 .250000/north: 90.000000 \nsouth: -90.000000 \nwest: 0.000000 \neast: 360.000000\nrows: 721\ncols: 1441/g" ww15mgh.grd -i
Separation Files
If projecting the aster data to another projection with a differing elevation model a separation file needs to be used to elevate the aster correctly. For example if projecting the DEM to a osgb36 UKBNG projection from wgs84 lat/lon the elevation model is different. To elevate the aster we need a description of the height differences between the geoid and the spheroid, a file describing the differences between the two can be found at:
- http://www.ordnancesurvey.co.uk/oswebsite/gps/docs/OSTN02_OSGM02files.zip
- Once the file has been downloaded run the command:
- mkdir OSTN02_OSGM02files; unzip OSTN02_OSGM02files.zip -d OSTN02_OSGM02files
- Now run:
- grass63 -text /PATH/TO/grass_db_template/UKBNG/PERMANENT/
- Grass should have opened if it did not look at the section above on Grass GIS
- First get the region that is going to be read in:
- r.in.xyz input=OSTN02_OSGM02_GB.txt output=OSTN02_OSGM02_GB.txt x=2 y=1 z=6 fs="," --overwrite -s
- This should return:
- r.in.xyz input=OSTN02_OSGM02_GB.txt output=OSTN02_OSGM02_GB.txt x=2 y=1 z=6 fs="," --overwrite -s
Range: min max x: 0.000000 700000.000000 y: 1.000000 876951.000000 z: -81.603000 0.000000
- Then actually set the region based on this, include a buffer size of 1 metre, resolution is 1000 for this file:
- g.region e=700001 w=-1 n=876952 s=0 res=1000
- Now read in the separation file:
- r.in.xyz input=OSTN02_OSGM02_GB.txt output=OSTN02_OSGM02_GB.txt x=2 y=1 z=6 fs="," --overwrite
- Now to check that the reading in of the file has worked run:
- gis.m
- In the manager click on "Add raster layer"
- Then click on "Base map" and select "OSTN02_OSGM02_GB.txt"
- In the "Map Display" click on "Redraw all layers".
- You should now see the raster map that has been read in
- gis.m
- Now the separation file has been read in a separation DEM can be created
- The raster map can be output to a file with the following command:
- r.out.gdal input=OSTN02_OSGM02_GB.txt output=uk_separation_file_UKBNG.dem format=ENVI type=Float32 nodata=0 --overwrite
- rm -f uk_separation_file_UKBNG.dem.aux.xml
- This DEM can be used as a separation file when projecting from osgb36 UKBNG to wgs84 lat/lon, however, we want it for projecting the other way. The DEM we have created here can be used later for use with the LiDAR, so do not remove it.
- The raster map can be output to a file with the following command:
- To project the DEM:
- First we need to get a vector representing the entire region of the DEM:
- v.in.region output=vector_box type=area --overwrite
- Then to get the resolution projected:
- Save the region so that we can get back here:
- g.region save=actualregion --overwrite
- Set the region to the the bottom left corner based on the resolution:
- g.region n=s+`echo \`g.region -p | grep nsres\` | awk '{print $2}'` e=w+`echo \`g.region -p | grep ewres\` | awk '{print $2}'`
- Create a vector box based on the resolution:
- v.in.region output=vector_box_res type=area --overwrite
- Reset the region:
- g.region actualregion
- Save the region so that we can get back here:
- To get the DEM in another projection:
- Project the resolution vector to the wgs84 lat/lon location:
- v.proj input=vector_box_res location=UKBNG mapset=PERMANENT output=vector_box_res --overwrite
- Set the region to be the size of the vector and then set the resolution:
- g.region vect=vector_box_res rows=1 cols=1
- Project the total region vector to the wgs84 lat/lon location:
- v.proj input=vector_box location=UKBNG mapset=PERMANENT output=vector_box --overwrite
- Set the total region:
- g.region vect=vector_box
- Project the separation file to the current location:
- r.proj input=OSTN02_OSGM02_GB.txt location=UKBNG mapset=PERMANENT output=OSTN02_OSGM02_GB.txt --overwrite
- Output the separation file:
- r.out.gdal input=OSTN02_OSGM02_GB.txt output=uk_separation_file_WGS84LL.dem format=ENVI type=Float32 nodata=0 --overwrite
- rm -f uk_separation_file_WGS84LL.dem.aux.xml
- Project the resolution vector to the wgs84 lat/lon location:
- First we need to get a vector representing the entire region of the DEM:
Attachments (3)
-
15_metre.jpg
(64.4 KB) -
added by adbe 14 years ago.
aster_15_m.jpg
-
30_metre.jpg
(45.8 KB) -
added by adbe 14 years ago.
aster_30_m.jpg
-
grass_db_template.zip
(4.4 KB) -
added by mark1 14 years ago.
grass_db_template
Download all attachments as: .zip